
INDEX:
Phase 1 - Executive Summary
Phase 2 - Prerequisites
Phase 3 - Deploy A Server
Phase 4 - Core Server Configuration
Phase 5 - Deploy an Apache website
Phase 6 - Full Stack Server Configuration
Phase 7 - Using WordPress as an Integrated FTP
Phase 8 - Install SMTP Mail Server
Phase 9 - Use Gmail as a client
Extras! - Install Node.js On a Debian 12 Server
Phase 5 Overview:
Verify DNS Configuration for our domain name
Create a proper directory structure for the webserver
create a website config file and enable it
Check Server for Error messages
Create a Webpage
Deploy SSL Certificate with Certbot.
ONE - Verify DNS Configuration for our domain name
See Phase 2 - Prerequisites - Section 2 - Accounts & Services - DNS - #9 Name.com
In Phase 2 we set up an account with Name.com and registered a domain name. We are now going to go back to Name.com and complete the configuration of our domain by assigning it to our servers IP address.
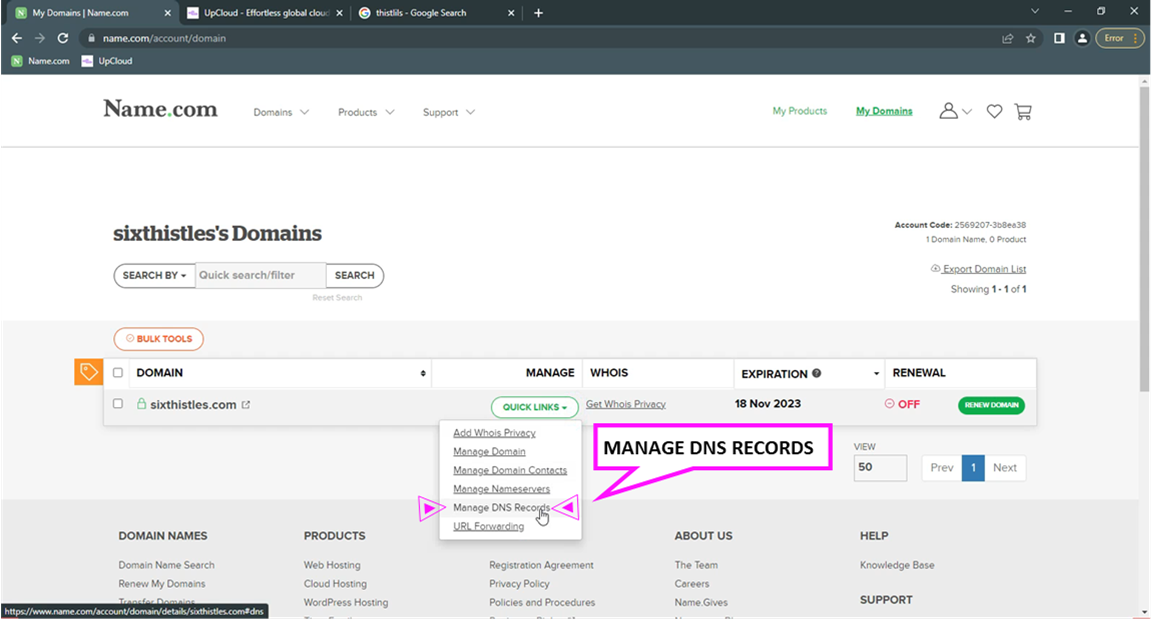
Log into your Name.com account & click “My Domains” at the top right.
Under “Quick Links“ select “Manage DNS Records“
For our first “A Record” we will leave the “Host” Blank, or you can use the “@” Symbol. For “Answer” type in your server IP Address Mine is “209.50.61.62“ for “TTL” (Time-To-Live) leave it at the default of “300” the “PRIO” (Priority) is not applicable here. Now click “Add Record”
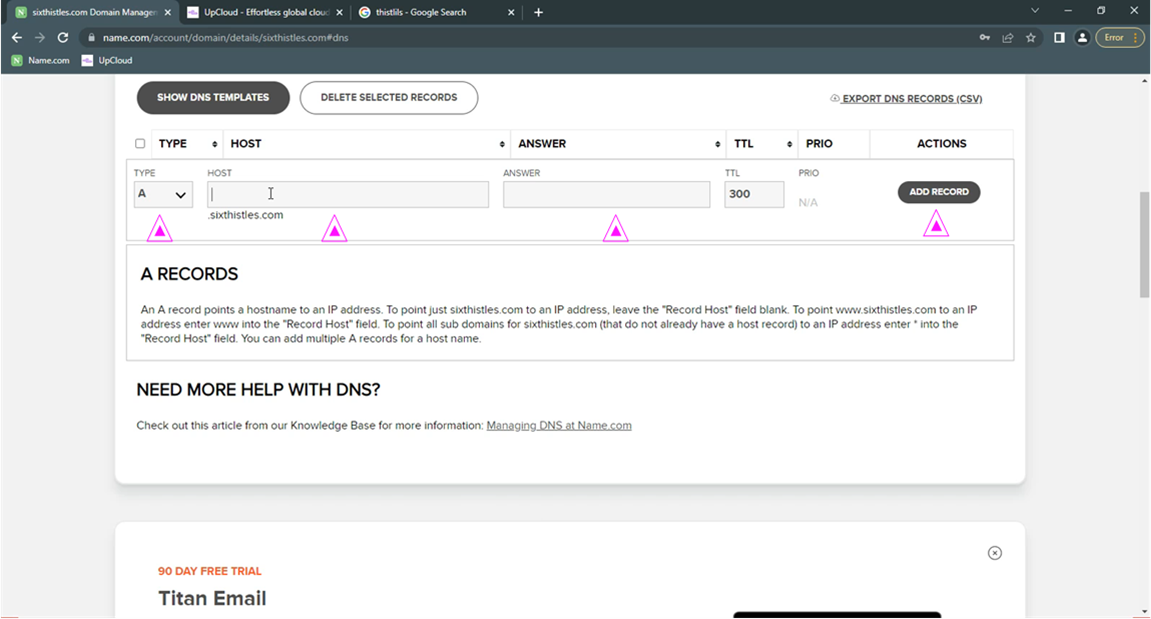
For our Second “A Record” it will be identical to the first record above EXCEPT we will add ”www” in the “Host” field. Go ahead and click “Add Record”
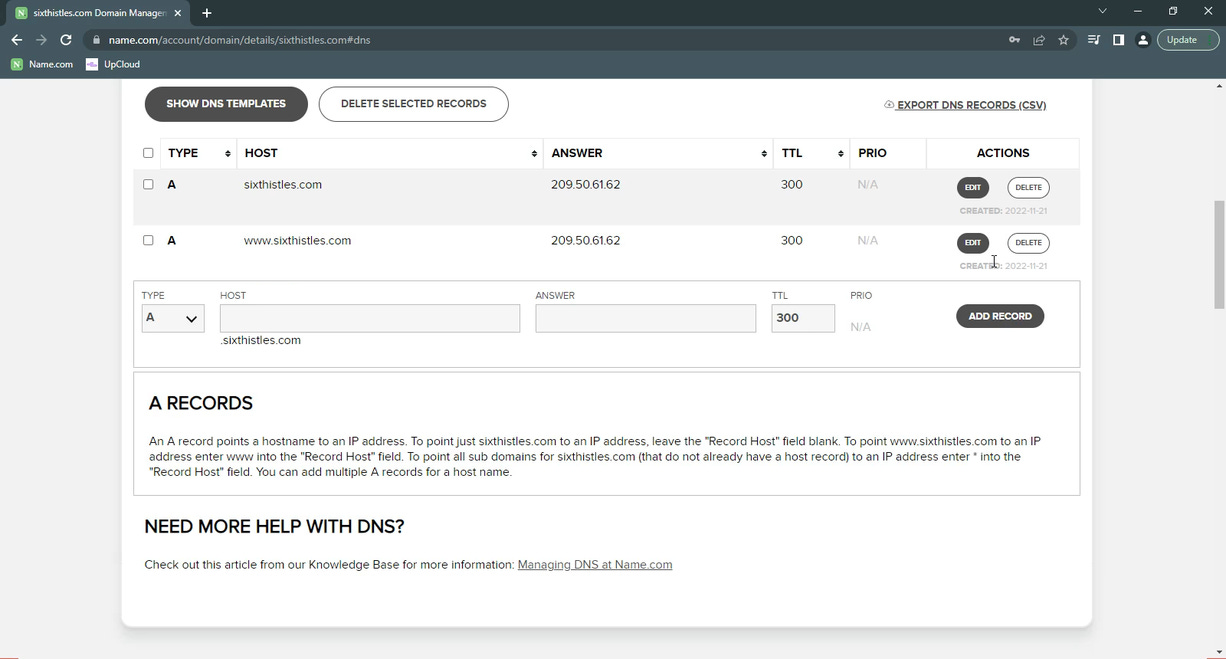
That's it no need to hit save, the records have been added. Now lets get back to the terminal in Visual Studio Code.
TWO - Create a proper directory structure for the webserver
SSH into the server:
ssh samson@209.50.61.62Create the directory for our website:
sudo mkdir -p /var/www/archiveninja.com/public_htmlConfigure general web directory read access. Here we will modify our permissions to ensure that read access is permitted to the general web directory and all of the files and folders it contains so that pages can be served correctly:
sudo chmod -R 755 /var/wwwCreate a New Virtual Host File
...
EXAMPLE SYNTAX
...
sudo nano /etc/apache2/sites-available/example.com.conf
...
sudo nano /etc/apache2/sites-available/archiveninja.com.conf Copy and Paste this into that file:
<VirtualHost *:80>
    ServerAdmin email@example.com
    ServerName example.com
    ServerAlias www.example.com
    DocumentRoot /var/www/example.com/public_html
    ErrorLog ${APACHE_LOG_DIR}/error.log
    CustomLog ${APACHE_LOG_DIR}/access.log combined

  #<Directory /var/www/example.com/public_html/>
          #AllowOverride All
  #</Directory>

</VirtualHost>
For ServerAdmin replace email@example.com with your email for Certbot SSL registration
For ServerName replace “example.com” with your domain name
For ServerAlias replace “www.example.com” with www.yourDomainName
For DocumentRoot replace example.com with your domain
You don't need to modify the <Directory /var/www/example.com/public_html/> here because it’s commented out and will be ignored. we may use that later on in another section.
Here is my config file:
<VirtualHost *:80>
    ServerAdmin info@treyark.com
    ServerName archiveninja.com
    ServerAlias www.archiveninja.com
    DocumentRoot /var/www/archiveninja.com/public_html
    ErrorLog ${APACHE_LOG_DIR}/error.log
    CustomLog ${APACHE_LOG_DIR}/access.log combined

    # The directory block below will be used for WP mod rewrites later
    # it also helps with archiving websites in wordpress

  #<Directory /var/www/archiveninja.com/public_html/>
          #AllowOverride All
  #</Directory>

</VirtualHost>
Save the file with CONTROL + “O” to “Write Out” the file, Press ENTER to confirm the changes, then use CONTROL + X to exit.
Enable the New Virtual Host File with this command: (swap my domain for yours)
sudo a2ensite archiveninja.com.confNow reload Apache’s configuration with:
sudo systemctl restart apache2You can check on the status of the apache2 service with systemctl status:
sudo systemctl status apache2If you get an error make sure that there are no extra characters in this config file. Sometimes when copying from a website you can get some random character added in the end like “~” look out for those! and remove anything that is not supposed to be at the end of code blocks.
Fix Server Error Messages:
When you ran the last two Apache commands you may have noticed some error messages like:
“...
AH00558: apache2: Could not reliably determine the server's fully qualified domain name, using 209.50.61.62. Set the 'ServerName' directive globally to suppress this message
..."
and
"...
unable to resolve host: Name or service not known
..."
Here’s how to fix these issues
First let’s modify the configuration file:
sudo nano /etc/apache2/apache2.confadd to end of file on a new line:
ServerName 127.0.0.1from:
...
# Include the virtual host configurations:
IncludeOptional sites-enabled/*.conf

# vim: syntax=apache ts=4 sw=4 sts=4 sr noet
...
to:
...
# Include the virtual host configurations:
IncludeOptional sites-enabled/*.conf

# vim: syntax=apache ts=4 sw=4 sts=4 sr noet
ServerName 127.0.0.1
...
Now save and exit with Ctrl + o and Ctrl + x
NEXT
Fix the “can't identify hostname” error. Edit the “hosts” file and add “yourServer_IP_Address yourServer_Name” ie: “209.50.61.62 cloudninja“ on a new line at the end of this file:
sudo nano /etc/hostsCopy this:
209.50.61.62 cloudninjaChange from:
...
127.0.0.1       localhost

# The following lines are desirable for IPv6 capable hosts
::1     localhost ip6-localhost ip6-loopback
ff02::1 ip6-allnodes
ff02::2 ip6-allrouters
...
Paste to bottom like this:
...
127.0.0.1       localhost

# The following lines are desirable for IPv6 capable hosts
::1     localhost ip6-localhost ip6-loopback
ff02::1 ip6-allnodes
ff02::2 ip6-allrouters

209.50.61.62 cloudninja
...
Now save and exit with Ctrl + o and Ctrl + x
Restart Apache:
sudo systemctl restart apache2Rerun config test to check for errors:
sudo systemctl status apache2To exit the status area use “Ctrl + c”
...
[Ctrl] + C
...
THREE - Create a webpage
Here we will create an index.html file and a styles.css file in the public_html directory for our site.
Create the index.html file:
sudo nano /var/www/archiveninja.com/public_html/index.htmlCopy and Paste this into the file:
<!DOCTYPE html>
<html lang="en" charset="UTF-8">
  <head>
    <title>Archive Ninja</title>
    <link rel="stylesheet" type="text/css" href="styles.css">
    <link rel="icon" type="image/x-icon" href="https://media.treyark.com/wp-content/uploads/2022/11/favicon-1.ico">
    <link rel="Shortcut Icon" type="image/ico" href="https://media.treyark.com/wp-content/uploads/2022/11/favicon-1.ico">
    <meta name="viewport" content="width=device-width, maximum-scale=1.0, user-scalable=1">
  </head>
  <body>

    <div class="section1">
        <div class="background1" ></div>
      </div>

      <div class="section2">
        <div class="background1" ></div>
      </div>

      <div class="section3">
        <div class="background1" ></div>
      </div>

  </body>
</html>
Now “write out” and exit with Ctrl + O and Ctrl + X
Create the styles.css file:
sudo nano /var/www/archiveninja.com/public_html/styles.cssCopy and Paste this into the file:
body{
  background-image: url('https://media.treyark.com/wp-content/uploads/2022/11/Hero-036.jpg');
  background-size: cover;
  height: 100vh;
}
Now “write out” and exit with Ctrl + O and Ctrl + X
Deploy SSL Certificate with Certbot
Run this command to acquire your SSL Certificate:
sudo certbot --apache -d archiveninja.com -d www.archiveninja.com...
EXAMPLE SYNTAX
...
sudo certbot --apache -d your_domain -d www.your_domain
...Enter your registration email upon request and allow, then you can accept or deny participation in the opt in:
info@treyark.comVerify Certificate Auto Renewal. Let’s Encrypt certificates are only valid for ninety days. This is to encourage users to automate their certificate renewal process. The certbot package we installed takes care of this for us by adding a renew script to /etc/cron.d. This script runs twice a day and will automatically renew any certificate that’s within thirty days of expiration.
To test the renewal process, you can do a dry run with certbot:
sudo certbot renew --dry-runNow navigate to your website to verify that you have SSL encryption and your site is secured with HTTPS: